
Thread Milling Education
This 29-minute presentation was recorded at the Scandinavian Technical Fair in Stockholm in 2010. It introduces the history and working principle of thread milling, explains its main advantages, demonstrates the SmiProg programming workflow used at the time and concludes with live thread milling in Hardox 600.
The presentation is in Swedish. The transcript below is an edited English translation of the video subtitles. It preserves the meaning of the original presentation while correcting the English for clarity. Product information and software shown in this historical presentation may have developed since 2010.
What you will learn
- How thread milling developed alongside CNC control systems.
- How a thread mill creates a thread through a helical toolpath.
- Why thread milling can provide a secure process in difficult-to-machine materials.
- How one tool can offer flexibility across thread directions, diameters and hole types.
- How ThreadBurr combines thread milling and deburring.
- How SmiProg was used to select a tool, calculate cutting data and generate CNC code for the Hardox 600 demonstration.
Read the full English transcript (29 minutes)
Full English transcript
SmiCut and the history of thread milling
00:05 Welcome. We are going to give a short presentation of our company, SmiCut. Here you can see three generations, so you understand that this is a family business. Among other products, we import solid carbide inserts from Kyocera in Japan.
00:26 In addition, we have our own production of solid carbide thread mills. Threading has been close to our family's heart for many years. More than fifty years ago, my grandfather was already producing solid carbide thread turning inserts, although those tools were for thread turning rather than thread milling.
00:53 Here it says thread milling, which is what we are going to discuss. We cannot ask my grandfather about it because he had already passed away when the first thread mill was introduced to the market. It is therefore appropriate to ask my father.
01:09 You will have to cover this subject: the history of thread milling.
01:15 Thread milling first became possible with numerically controlled machines—machines that could be controlled by computers.
01:30 Initially, thread mills were developed to solve applications where taps were very expensive, either because the threads were large or because a product was still under development and the manufacturer did not want to invest in special taps.
01:56 One example came from Falun in the mid-1970s, when Scania asked whether we could develop a thread mill. They had acquired new machining centres for producing threads in rear axle housings. The threads had a diameter of 150 mm and a pitch of 2 mm, making this an excellent opportunity for thread milling.
02:30 Thread milling was not simple at that time because the control systems were not as fast as they are today. A machine might have three axes, but its control system could coordinate only two axes at a time. The software therefore had to be worked around by moving in small sections and making adjustments. It could take up to five minutes to mill a thread with a diameter of 150 mm.
03:04 The machines and their control systems gradually became more powerful. CNC technology was a major breakthrough.
03:15 Many people looked for ways to save time. Some added more inserts to the holder, increasing the number from two to as many as four. A process that had previously taken five minutes could suddenly be completed in 2.5 minutes, or in some cases in only one minute.
03:38 Thread milling still took a long time, so taps remained the most widely used method during the 1970s except for very large threads. Control systems and machines continued to develop, while spindle speeds increased. This made it possible to thread mill progressively smaller diameters. Eventually, the threads became so small that the inserts would no longer fit on the holder.
04:17 The natural next step was to use solid carbide thread mills. A solid thread mill can have more cutting edges and can produce longer threads.
04:31 With an indexable holder, it was often necessary to machine the thread in two stages. A solid thread mill is much more stable and can produce the thread in one stage, saving considerable time. At the time of the presentation, SmiCut was producing thread mills for threads down to M2.
04:58 The thread mill is no more than 1.5 mm in diameter. Please visit our stand to see how small these tools really are. If your eyesight is not good enough, you can borrow a magnifying glass.
05:13 We did not bring a microscope, although I know that some people use one. That shows how small modern thread milling can be. The workpiece materials are often difficult to machine, such as titanium and hardened steel. We are going to demonstrate thread milling in Hardox 600 at approximately 57 HRC.
05:39 Thread milling can also be used in materials up to 65 HRC. Imagine trying to machine those materials with a tap.
05:50 I will hand over this part of the presentation to Timo. He has learned a great deal about this development over the years.
The Schmidt family has worked with threading for more than fifty years. I have worked with it since I finished school, as have my son and his son. We therefore have extensive experience. Please contact us if you have problems with thread milling, thread turning or any other aspect of threading.
Timo, please go ahead.
Thank you.
How thread milling works
06:26 We are going to discuss the advantages and possibilities of thread milling. Before looking at them, however, we should review the basic principle.
06:40 Let us begin with how a thread mill works. Many of us may already know this, but some people here today may not.
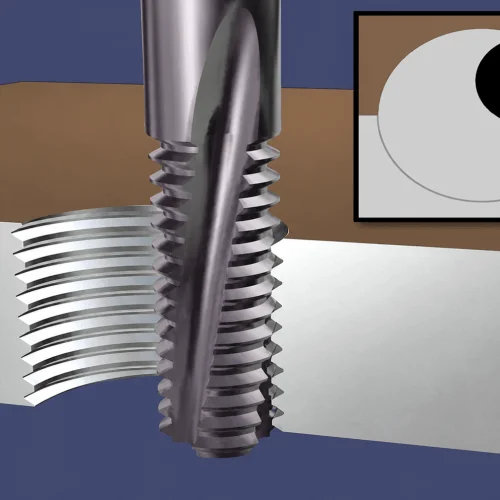
The illustration shows that the tool diameter is smaller than the hole diameter or thread diameter. This differs from a tap. Let us start the milling process.
07:09 The tool moves around the hole to create the thread profile while the machine is programmed to move axially. For a thread with a 2 mm pitch, the machine moves 2 mm during one complete revolution.
07:25 That is the basic working principle. We can now move on to the advantages and possibilities of thread milling.
Process security and difficult-to-machine materials
07:38 Thread milling provides a secure machining operation. This is one of the main reasons many manufacturers begin using milling to produce threads. The risk of an unplanned machining stop is low because the cutting forces are low and the chips are short.
07:58 We will show an animation to make this easier to understand. The tap is on the right, and the free-cutting thread mill is on the left.
08:10 Do you recognise this situation? Many people have experienced it and become frustrated. The workpiece is almost finished, but everything is ruined because the tap breaks.
The thread mill usually survives because of the low cutting forces, although an accident can happen even with the best process. As you will see, however, it does not have to ruin the workpiece. Watch the thread mill on the left.
08:43 You may have to buy a new tool, but the workpiece is still saved. In many applications, that is extremely valuable.
08:53 This is one reason for choosing milling when producing threads. It also leads directly to the next advantage: thread milling can be used in difficult-to-machine materials—materials that nobody wants to machine but that sometimes cannot be avoided.
09:14 As Reinar mentioned earlier, thread milling can be used in materials up to 65 HRC, as well as in titanium, Inconel and many other materials.
These applications are possible because of the favourable cutting conditions.
09:27 The first two points are often why a manufacturer initially adopts thread milling. Afterwards, people discover that the process is useful in other materials and applications because it offers many additional advantages.
Thread quality and tool flexibility
09:46 One such advantage is higher thread quality. Everyone wants to produce a good product—an excellent product.
Thread milling can produce a very fine thread with a smooth surface finish and close tolerances.
10:09 A thread mill is also a flexible tool. How is it flexible? The same tool can produce both right-hand and left-hand threads. To make a right-hand thread, the tool moves around the hole while the machine is programmed to move upwards.
To make a left-hand thread, the same tool is used, but the machine is programmed to move downwards. The same tool can therefore produce both thread directions.
10:44 The same tool can also produce different thread diameters. Here you can see a solid carbide thread mill. It first mills a smaller thread and then, using the same tool, a larger thread. This is possible when the thread profile and pitch are the same.
11:04 Tapping commonly requires different taps for blind holes and through holes, such as spiral-fluted or straight-fluted taps. With thread milling, the same tool can be used for both blind and through holes.
11:17 For certain thread profiles, the same thread mill can also produce both internal and external threads. However, this is not possible for the most common metric threads because of how their thread profiles are designed.
Most thread-milled threads are internal threads.
Blind holes, spindle wear and energy use
11:43 When tapping a blind hole, the hole must be drilled considerably deeper because the tap does not produce a complete thread profile until its third tooth. Thread milling can produce a complete thread profile much closer to the bottom of the hole.
12:07 This can make it possible to change the component design. The animation shows that the hole for the thread mill is drilled much less deeply than the hole for the tap, while both processes produce the same effective thread depth.
12:24 Designers should consider this when developing their products. Thread milling can provide additional design possibilities.
12:39 Thread milling can also reduce wear on the machine spindle. This may not seem directly related to threading, but consider how a tap works: the spindle starts, moves to the bottom, stops, reverses, stops again and returns. This sequence is repeated for every thread.
13:01 With a thread mill, the spindle starts and continues from one hole to the next. Machine spindles will naturally require maintenance or rebuilding, but thread milling may reduce how frequently this is needed compared with repeated tapping cycles. This can be a hidden cost that is easy to overlook.
13:33 The next point is related: energy-efficient production. Repeatedly stopping, starting and reversing the spindle during tapping requires energy. Thread milling can avoid much of this repeated acceleration and deceleration.
13:45 At the time of this 2010 presentation, an EU directive was encouraging tool and machine-tool manufacturers to develop more energy-efficient products. Moving suitable applications from tapping to thread milling was presented as one way to reduce energy use.
Thread milling in lathes and chip control
14:12 Thread milling can also be performed in a lathe with live tooling. When people think about milling, they normally imagine producing a thread in a milling machine or machining centre. Modern lathes, however, are no longer only lathes. Many are also machining centres with rotating tools that are stable enough for thread milling.
14:43 It is a fast method with excellent chip control, as we will now see.
14:47 Thread turning is shown on the left. Chip jamming is a problem many operators will recognise. We sell a significant number of internal toolholders because they can break when chips jam during thread turning. Thread milling avoids this long-chip problem. The chips are short, and the process is fast because several teeth are cutting instead of the single-point thread turning tool.
ThreadBurr: threading and deburring in one operation
15:18 Can thread milling produce a thread without burrs? Yes, when using the SmiCut thread mills shown here. At the time of this presentation, SmiCut offered thread mills as standard that also deburred the thread in the same operation.
15:43 This leads to another advantage: shorter machining time.
15:50 A tap manufacturer may argue that thread milling takes too long. For some coarse threads, tapping can indeed be faster. However, thread milling is often faster for large diameters, fine pitches or long holes.
16:14 When we also consider that the thread is deburred and that the hole does not have to be countersunk before thread milling, thread milling may also be faster for some coarse-thread applications.
16:30 At the time of the presentation, most thread mills sold by SmiCut were for coarse threads. We will show a short film to demonstrate how this works.
16:46 We call this product ThreadBurr—the burr-free thread mill.
16:59 We will compare two holes. On the left, a conventional thread mill is used. On the right, the hole is first deburred with a countersink. The burrs on the left are what manufacturers want to remove, which is why a hole is usually countersunk before thread milling or tapping. The photograph shows that the result is still not ideal.
17:21 Now we use the new ThreadBurr. It performs threading and deburring in one operation, with no additional deburring time. The tool on the right is our thread mill.
17:32 It works in the same way and at the same speed as a conventional thread mill, but the thread is completely deburred. This is also a photograph of the actual result. What is the secret? The principle is simple: we added a cutting edge at the top of the tool to remove the burr while milling the thread.
17:52 Here you can see the comparison again. The conventional thread mill on the left requires countersinking. ThreadBurr runs just as fast but produces a burr-free result. Countersinking first takes additional time and may still not produce the same result, making ThreadBurr considerably faster for the complete operation.
18:10 We are proud of this product. At the time of the presentation, SmiCut had changed its complete standard thread mill range to the burr-free ThreadBurr design.
Selecting a tool and generating a program with SmiProg
18:19 We also developed software called SmiProg. Although thread milling had been available for several years, it had not yet been adopted throughout the industry.
18:32 Why? Many operators were still uncertain about which tool to use, which cutting data to select and how to program the operation. SmiProg was designed as an easy programming tool. At the time, it could be downloaded free of charge from the SmiCut website.
18:59 The software takes only a few minutes to learn. Before you leave today, my son Oliver will demonstrate how to use it.
19:20 As we have heard, SmiProg is a programming tool. We have worked to make the software both easy to use and functional. Let us take a look.
19:34 Because most of our thread mills are exported, we wanted the software to work around the world. One reason for building this version in Microsoft Excel was that the program was widely available.
19:47 Another advantage of the Excel-based version was its file size of less than 500 kB, making it easy to share or download from the internet.
19:58 Here is the program. This version was available in more than 19 languages, making it accessible to users in many countries. For this demonstration, we will select Swedish.
20:13 The first choice in SmiProg is whether the thread mill will be used in a milling machine or in a lathe. As shown earlier, thread milling can also be performed in a lathe.
20:29 We select the milling-machine option. The CNC program appears in the centre column. Notice that whenever we change an input, the program updates automatically.
20:46 The next choice is the control system. This version of SmiProg includes Fanuc and Heidenhain.
20:55 Are there other control systems? Of course, but at that time we had not yet developed dedicated output for more systems. Fanuc output is still useful because it uses ISO programming. Even if your machine uses Siemens or another system, SmiProg can provide a useful starting point.
21:19 A few adjustments may be required, but the coordinates remain correct. The third selection is the thread standard. Whitworth and Unified are available, but for this example we will select a metric thread.
21:40 The next selection is the material: low-carbon steel.
21:46 We then enter four values. First, the thread diameter: M20. Next, the pitch: 2.5 mm. The thread length is 25 mm. Finally, we enter the safety distance. The illustration on the right shows where the program is set to begin and how far above the centre it starts. The selected distance of 2 mm is sufficient.
22:20 SmiProg automatically suggests the standard tools that can produce this thread.
22:29 If we select the first option, a 12 mm thread mill, the program provides tool information, cutting data and the estimated machining time. This thread takes 12 seconds.
22:46 Let us try another, stronger tool: a 14 mm thread mill. The program and cutting data update immediately. The estimated machining time is now only eight seconds.
23:06 We are almost finished. It is that simple: we have selected a tool, obtained cutting data and generated a CNC program. However, we recommend entering one additional value.
23:19 The field is labelled cutting diameter of the mill. It currently shows 14 mm, which is the nominal thread mill diameter. Manufactured tools always have tolerances, so SmiCut measures the pitch diameter of every thread mill.
23:41 The pitch diameter is important when producing a thread. We measure it optically and laser-mark the calculated external cutting diameter on each individual tool.
23:53 Entering the laser-marked value in SmiProg helps the first thread fall within tolerance. The thread mill in this example is marked 13.92 mm.
24:08 The values in the centre column update automatically.
24:16 We have completed the initial setup. Because the live demonstration will use Hardox 600, we must adjust the program. First, we select the material. SmiProg then chooses two passes instead of one based on the material. The software takes the machining conditions into account.
24:47 Hardox 600 in this demonstration is harder than 55 HRC, so we adjust the cutting speed to 35 m/min and reduce the feed from 0.045 to 0.04 mm/tooth.
25:08 I would now like to hand the presentation back to Timo.
Live demonstration in Hardox 600
25:16 We have reached the most exciting part. Let us see whether the live demonstration is successful. We will use the values shown on the screen: a cutting speed of 35 m/min and a feed of 0.04 mm/tooth for an M20 thread in Hardox 600.
25:40 Here is the material: Hardox 600 at 57 HRC. Before milling the thread, we first have to drill the hole. We will use a short-hole drill from Kyocera, the Magic Drill DRX.
26:04 On the screen, you can see the thread mill that will be used. It looks slightly different from the tools shown earlier. Can you see the difference? There is a straight cutting edge at the tip of the tool.
26:20 Why? This tool deburrs both the top and bottom of the hole while it mills the thread—three machining tasks in one operation.
26:39 It is time to put everything to the test. Please change the camera.
26:56 The drill is running at a cutting speed of 80 m/min and a feed of 0.07 mm/rev. Visitors to the fair were invited to see the drills at the SmiCut stand after the presentation.
27:30 Drilling is complete. The machine will now change to the thread mill.
27:39 The thread mill will deburr the top and bottom of the hole while milling the thread. Because the workpiece is hardened steel, the operation will use two passes.
27:51 The first pass removes two-thirds of the thread depth, and the final pass removes the remaining third. Most thread-milled threads are produced in a single pass. With this difficult-to-machine material, an additional pass can be advantageous, although the operation can also work in one pass.
28:11 In tests performed by SSAB, machining in one pass worked very well. They also tested the same thread mill in the even harder Hardox Extreme, at up to 62 HRC.
28:32 They were extremely pleased with the result. After producing more than 30 holes, the thread mill was still in good condition. The test used a cutting speed of 28 m/min and the same feed as today's demonstration, 0.04 mm/tooth.
28:47 At the next fair, we will have to ask them to bring an even harder material—or we will have to produce smaller threads. Both M2 and M3 threads can be milled in very hard materials. They had also successfully tested M3 in Toolox 38.
29:12 The operation is complete, and it finished without any drama. Wonderful.
Thank you very much.